when we last saw dusty, she was tied to the railroad tracks . . . luckily, along came jones to rescue her!

(please note: the lady in the picture is not me - my hair is much shorter.)
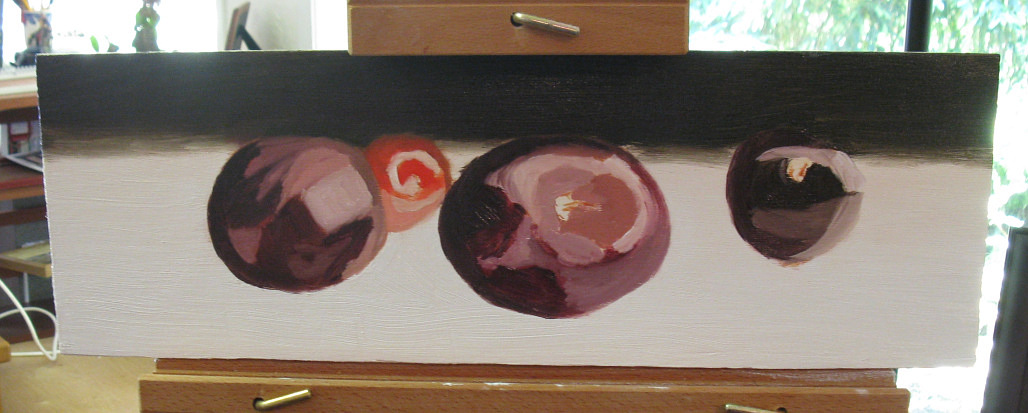
but i'm back now, and present: Cherries - the block-in
actually, i'm going to backtrack and start from the beginning. so far this painting has engendered some firsts for me, including creating a support from scratch, & i want to include you in my journey through them!
i didn't have a prepared canvas that was the right proportions for my crop of the original pic (which you'll find in the previous post). i did have a large piece of very nice 1/4" 3-ply plywood, so i cut an 18"x6" piece with my trusty circular saw (with my son supervising - i am totally scared of power tools). i took a fine-toothed rasp & filed the edges smooth, then wiped it down with a barely-damp cloth.
when it was dry, i gessoed it. i put a couple of sticks of wood down on newspaper to hold the support up (otherwise it sticks to the paper when it's dry - thanks to my partner for that hint!). i first put down some blobs of gesso, then used an old 2" hardware-store bristle brush (you'll see it a couple of pics down) to spread it evenly, ending up with strokes going along the grain (in this case, the long way). here i have a question for the other artists reading this - i used the gesso straight outta the bottle - but i've read that one should thin it with water first. what do you do? is what i'm doing ok?
here's the first coat on:

btw, if you're chemically sensitive as i am - the gesso may do you in! i had to do it with all the windows open & it was still really bad. i may try latex primer next time (as tho that'd be better?!), or i may end up having to use solely prepared canvases, which i really don't want to have to rely on (especially since i've learned how to cut supports myself!). anyone have any ideas? can one properly prepare a support using only oil paint - giving it a layer or two of, say, titanium white?
after the first layer was dry, i gave it a light sanding with very fine sandpaper (the back says, "220-c"?) which i just folded into a rectangle. i do have a palm sander, but i was concerned it'd take off too much. and it's a power tool.
then, on to the next layer - here are the blobs:

this second layer i finished with the strokes going down the short way on the support, which, when it dried, gave it a finish like a fine linen. i doubt i'll ever do so well again!! i finished the support by putting on a layer of titanium white. in the past, i've found that painting right on gesso seems to dull out the thinner layers of paint, so the finished surface is blotchy. but those paintings i've done over a layer of oil paint have all been uniformly glossy, like i like it!
here it is, all set to start (once it's dry, that is!)

i used transparent red iron oxide to do the sketch - i didn't thin it since i wanted it to not be too wet when i was ready to paint, so i tried to just use it sparingly. when i first got these paints i wrote to m. graham (they've been quite friendly!) & asked what to do about thinning underlayers (since with these paints, you use oil to thin) vs. fat over lean. they wrote back & said, basically, "don't thin the paint so much as paint thinly." so far, that's worked fine!
i used a 0 sable filbert for the sketching, which at first i did by eyeballing it. cue the Surfaris tune, Wipeout, 'cause that's what i had to do!

to do that, btw, i just put a bit of clean walnut oil on a paper towel & rubbed, then went over it with a dry portion of the towel. i also brushed it with a clean rag to make sure there was no towel lint left.
so then i started using every ruler & measuring stick i had, and doing a little math to figure out proportions & placement.

would a grid have been easier? probably! but i wanted to keep a more eyeballed look compared to the original. i marked where the center of the bottoms of the cherries would hit,

and then was able to sketch in the rest, including the highlights on the cherries & a hint of the shadows on the table.

today - the block-in!
i started by deciding which colors i was going to need and came up with:
alizarin crimson
transparent red iron oxide
cadmium red light
cadmium yellow light
phthalocyanine green
anthraquinone blue (first time using this one - i like it!)
i find this part really hard. i keep telling myself i should make color charts to better familiarize myself with the possibilities of all my colors, but . . .
overall, i think the colors worked for what i wanted to do. the green is in there since i wanted to put the barest hint of it in both the foreground table area & the background, to offset the red-purples of the cherries. i put a blob of white on my palette & added just the tiniest bit of thalo green (on the left).

hmmm . . . maybe for mint ice cream...
so i put a new blob of white down & added just a bit of the ice cream - perfect. using a 12 bristle flat, i put in the foreground. then i mixed the background. normally i try to use only two colors in a mix, three on the outside. but for this one, i went with four: alizarin, red oxide, thalo green, & the blue. after putting this in, i added some alizarin across the middle to give a bit of movement to it (i hope!). these are all transparent colors, which i like to use for backgrounds. i used a 10 flat bristle for this stage.

then- the cherries themselves. i used a base mix of the alizarin & trans red for the darkest, in shadow parts of the cherries, keeping them transparent. for the light-struck & highlight areas, i added either the foreground color (in some cases mixed with a bit of trans red) or straight white, depending on what was needed. i mixed a bit of the yellow into the cad red light to gt a base color for the bright cherry behind the others, and used white or the foreground color (mixed with some trans red) for its shadowing & highlights.
i started out using a 6 flat bristle, but really didn't like the way it interacted with the board for the texture of the cherries. i switched to a 4 sable (i think it's a flat; it's unmarked) - my first time using a sable in a painting! and i loved it! oooo - the feel of the paint going down so sensuously - wow! that's something i wanna do some more!
and here it is - the initial block-in:
whew! tomorrow (i hope!), i can start refining it - & i have a little list!
- work the table surface so that it moves back as it recedes from the viewer
- put in the shadows, reflections, reflected colors on the table surface
- make sure the background isn't stagnant, which i think it is
- work on the color of the bright cherry
i asked my son to check the block-in out (he has a great sense of color & composition) & he said the color of that one was wrong - it had no purple in it. sure enough, when i checked my palette

i realized he was right! (the colors for that one are the bright ones on the left.)
after all that's done, i'll see what i want to change with the other cherries. knowing me, i'll smooth out the color gradations at least a bit. then the centers & stems & we'll see what we all think!
thank you for stopping in!
till next time-
dusty!


No comments:
Post a Comment
Thank you for your comments! (you can comment even if you don't have a blogger account!) i appreciate all feedback & i'll try to respond here asap!